Limiting & Clipping section
The final clippers and limiters.
Stereo Tool has 2 clippers built in:
- Simple Clipper
This clipper is indeed very simple. It does not handle distortion too well, so you should only use it to remove some occasional spikes. - Advanced Clipper
The Advanced Clipper uses a lot of techniques to minimize or even completely remove digital clipping and intermodulation distortion. It can produce an extremely loud, yet still dynamic and distortion-free sound. The Advanced Clipper requires registration.
These clippers may still leave some very small spikes through. To remove those,
Hard Limit output can be used.
Final peak remover panel
Removes small peaks above 0 dB in the audio.
Final peak remover settings panel
- Hard Limit output
Removes any small remaining peaks after the rest of the processing.
This is the final step of the processing chain. If there are any peaks left above 0 dB, this removes them by quickly lowering the volume around the peak. This filter was built to avoid creating harmonics, not to sound good - so it should not be used to remove big spikes.
If the Post Amp slider is set close to 1.00x (0 dB), HARD LIMIT should always be enabled to protect against clipping. For FM output it should also always be enabled, to protect against overshoots.
- Limit speed
Determines how fast Hard Limit responds to overshoots.
Prepare for lossy compression (MP3/AAC/OGG/...) panel
Protects the output against overshoots when using lossy compression (MP3 etc.) on it.
If you compress the tightly clipped output of Stereo Tool with a lossy codec such as MP3, AAC, Ogg, you will notice that you get spikes again. This is caused by the fact that almost any change in the tightly clipped signal will cause it to be less tightly clipped. To avoid getting distortion, you need to lower the output level.
But because differences in the signal occur much more in higher frequency ranges, it helps to boost the highs a bit before clipping, and lowering them again afterwards.
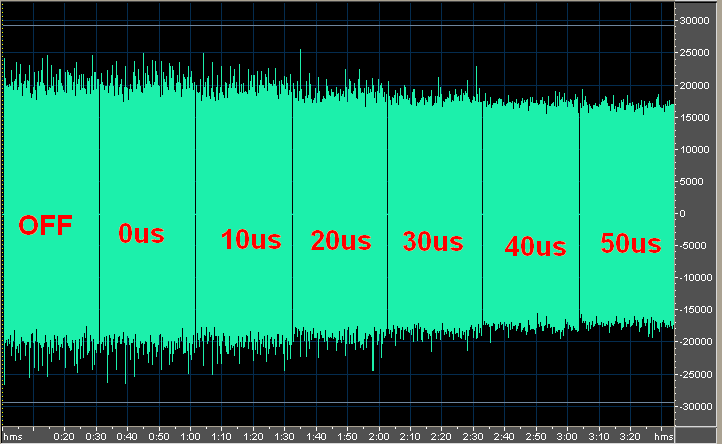
This graph shows the effect of different settings on a 128 kbit/s MP3 file.
Lossy Compression affects
Advanced Clipper and
Hard Limit output.
- Pre-emphasized clipping/limiting (MP3/AAC/OGG/...)
Turns pre-emphasized limiting and clipping on.
- Pre-emphasized clipping/limiting to reduce codec overshoots
Pre-emphasis.
The amount of pre-emphasis to use before, and de-emphasis after, clipping.
- Optimize audio for lossy compression (clean)
Protect lossy FM stream to transmitter panel
Protects an FM signal thats sent to the transmitter over a lossy link.
See
Prepare for lossy compression (MP3/AAC/OGG/...). The same effect can also be used for lossy FM links. The total amount of pre-emphasis is really big, so this really should only be used if loudness isn't very important (for example in countries with loudness limitations, such as BS412).
Reduce highs on streaming outputs panel
- Reduce highs on stream
- Reduce highs (de-emphasis)
Simple Clipper section
DEPRECATED! Clips the audio below 0 dB with little protection against distortion.
This filter is good at removing short spikes, but causes distortion if it needs to clip too much.
If the
Advanced Clipper is enabled, this filter is in bypass mode, except that it amplifies the audio with the value set in the slider.
Simple clipper
Turns the Simple Clipper on.
Simple clipper drive
Amplifies the input level by this amount.
Pre-limiter enabled (avoids distortion)
Distortion protection.
Quickly lowers the volume if the input level exceeds this level. Use with care, may cause distortion by itself if the cause of the high input level is loud bass.
Pre-limiter volume
The level at which the Pre Limiter starts to work.
Advanced Clipper section
Clips the output, while removing distortion caused by clipping.
Boosts the output level without increasing peak level. The Advanced Clipper can make the sound up to 12 dB louder, without causing higher peaks (hence clipping) in the output.
The clipper in Stereo Tool detects and actively removes (almost) any distortion that is audible by humans - but nothing else! This results in a clean, open, dynamic and very bright sound.
This filter is intended for FM, AM or internet radio stations that want to sound loud. It can also be used to create a 'denser' sound.
Loudness leaves some small spikes in the signal. Therefore, if you use this filter, and the
Post amplifier slider is set at (or just below) 0 dB, make sure that
Hard Limit output is enabled to avoid distortion caused by clipping. If you use Stereo Tool to prepare an FM signal, always turn
Hard Limit output on when using the Advanced Clipper, regardless of the Post Amp slider setting.
Main panel
Loudness panel
Volume settings that control the clipper behavior.
- Advanced Clipper
Enables the Advanced Clipper.
When the Advanced Clipper is enabled, the Simple Clipper is automatically disabled, but the advanced clipper level is still adjusted for the simple clipper's Loudness.
- Requires advanced clipper
- Clipper drive
Sets the amplification before going into the clipper.
Clipping always occurs at 0 dB, this slider adjusts the input level to match.
- Web/HD/DAB clipper drive
Allows setting the clipping level for streaming separately.
Typically, audio for FM needs to be clipped much harder than streams. This setting determines how much lower (or higher) the clipper drive for non-FM output is.
FM panel
Streaming / HD panel
Oversample limiters and clippers panel
Forces the clipper to use in 4 times oversampled mode.
This removes any spikes over 0 dB that are created in the sound card during playback. These spikes can cause distortion based on the sound card design, but they don't have to.
This means that the clipping is stronger, hence may cause slightly more artifacts for high frequencies. For FM processing, this is automatically enabled regardless of the setting.
- Oversampled limiting and clipping
Turns oversampled limiting and clipping on.
Composite clipping (FM) panel
Composite clipping greatly improves the quality of loud FM transmissions.
The composite clipper can create upto 160% left and right channel modulation while keeping the total modulation at 100%. It also allows the usage of Single Sideband stereo coding and several reception improvements.
If the audio is clipped normally, and stereo encoding and RDS encoding are added afterwards, the output that is generated will only rarely peak to the maximum modulation. Multiple dB's of signal headroom are wasted by clipping the audio without looking at the stereo pilot, RDS signal and how the L+R and L-R modulated at 38 kHz contribute to the peak level.
To give a simple example: If there's a high frequency peak in the audio, and both the stereo pilot and RDS signals are peaking in the opposite direction, then the peak in the audio could be clipped at a much higher level. It is possible to 'hide' audio peaks inside the holes created by the pilot and RDS signals. The effect of the 38 kHz modulation of the L-R signal is even bigger but also much harder to explain.
When using normal audio clipping and then adding the stereo and RDS signals, the left and right channel audio level after demodulation on an FM receiver will always be a bit below 100%.
FM composite limiter overdrive can get it closer to 100%, but it will never exceed 100%. When using composite clipping, values over 160% can be reached. The audio level coming out of the receiver still won't exceed 100% though, because only high frequencies can reach levels above 100%, and they are reduced with de-emphasis in the receiver.
The composite clipper can not be used if you are using an external stereo coder, and works slightly less good with an external RDS encoder.
For a description of all the settings, see
Composite Clipping.
More Composite Clipper settings panel
Composite Clipper CPU usage settings panel
"Rules are there to be broken" - Louder! panel
Settings that work around some traditional FM limitations to generate a louder and cleaner signal.
FM reception optimization: mono compatibility panel
Settings that protect against FM multipath reception and improve mono compatibility.
- Mono reception compatibility
Removes extreme phase differences to reduce multipath and improve mono compatibility.
If the left and right channel are in anti-phase (for certain instruments), the L-R signal is very strong, which makes the RF bandwidth on FM wider, which in turn increases the chance of getting multipath reception issues.
Beside that, if reception goes to mono - and in fact also if someone is listening to a stream on a mono device such as a phone - the instruments that are in anti-phase would disappear completely, or get reduced in level.
This filter makes it possible to determine the maximum phase difference between the left and right channel.
Setting it very low will reduce the experienced stereo image.
- Normal phase difference below
Disables the filter below this frequency.
This should normally just be kept at 0.
- No phase difference above
The filter is maximally effective above this frequency.
This should normally just be kept at 0.
- Limit phase difference
The maximum phase difference that's allowed.
- Center bass
Makes the bass mono.
Bass frequencies typically have a very small effect on experienced stereo (unless you're using headphones), but a big effect on FM reception. So, it's usually a good idea to broadcast the bass in mono.
- Up to
Bass below this frequency is made mono.
Mono reception compatibility settings panel
Center bass settings panel
Optimize audio for streaming panel
- Reduce parts of the stereo to help low bitrate codecs
Stereo reduction for streaming settings panel
- Streaming Stereo Difference
- Normal stereo below
- Minimum stereo above
- Reduce stereo phase differences to
- Reduce stereo separation to
Streaming specific settings panel
FM specific settings panel
Behavior panel
Limiter settings for streaming output, which can be used instead of clipping.
- Limit instead of clip
Use a limiter instead of the clipper for streaming output.
Limiter settings panel
Speeds panel
Levels panel
Detection panel
- Max limit attack
Slowest possible limiter attack time (backwards in time) if a lot of bass is present.
- Max limit release
Slowest possible limiter release time if a lot of bass is present.
- Detect bass below
Bass detection frequency.
Audio is seen as bass if it's below this frequency.
- Bass detection fadeout
The speed at which the bass detection value fades out if no bass is seen anymore.
This should be slow enough to cover the area between two bass sine wave cycles.
- Bass sensitivity
Sensitivity to bass. So, how strongly does detected bass affect Relative attack/release times for no bass.
- Relative attack/release times for no bass
Limiter attack/release speedup if no bass is detected.
The idea here is that when there's no bass, the limiter can move very fast without causing intermodulation distortion. If there is a lot of bass, the limiter needs to move slower.
Slower movements lead to lower output levels, so if the difference is too big and the limiter is working very hard, bass tends to cause volume drops.
- Attenuate output
- Legacy mode
Miscellaneous settings panel
Bass section
Settings that affect the sound of bass.
Bass and highs panel
Bass shape panel
Deforms the bass to achieve louder levels and sound better on some speakers.
Deforms low bass sounds if they are being clipped by making the tops 'flatter', to make them sound louder at the same peak level. This adds harmonics, so if too much is used it can sound bad, especially with electronic music which contains very clean bass sounds. Another effect is that bass is more audible on speakers that are bad at reproducing bass.
- Strength
Controls how much deep bass sounds are made louder.
- Allow harmonics up to
Controls upto which frequency the bass may be deformed to sound louder.
Bass sounds upto this frequency can be deformed to make them sound louder without getting higher peak levels. Setting this value higher gives more bass, at the cost of the sound quality of the bass. Values upto about 160 Hz should be fine.
DC offset panel
Settings that control DC offsets in the clipper output.
- Forcibly remove DC caused by Advanced Clipper (reduces quality)
Don't allow Loudness to add a DC offset.
In some cases, clipping only occurs in one direction (for example because there are spikes in one direction, but not in the opposite). Normally, Loudness will move the DC offset level to reduce the needed amount of clipping. This may however cause a DC offset in the output for a longer period of time, which is not always accurately reproduced by a sound card. So if you are feeding an FM transmitter with your sound card, and it's not phase linear, it's usually a good idea to enable this setting to avoid getting too big spikes in your FM modulation.
Bass protection (Deprecated) panel
Was needed in the past to protect against intermodulation distortion. Also boosts deep bass.
Highs section
Settings that protect the clipper against excessive highs.
Excessive highs can punch
holes in the rest of the audio, which is generally perceived as very annoying in music (it's ok with speech). This is usually only a problem for FM output, where the highs are boosted by
Pre-emphasis and a lot of clipping is used to reach high output levels.
Highs de-esser panel
Reduces excessive highs caused by Pre-emphasis.
It tries to do this with as little impact on the sound as possible. This filter only responds if the total level would be too high, so if there are no other sounds present it will not reduce the highs a lot, regardless of how loud they are. This means that it normally has no impact on speech, only on music. For FM output, the de-esser is far less needed when using
Composite Clipping than when using traditional clipping.
- De-esser limit
Sets the value above which the de-esser needs to work.
- De-esser slope
Ignore de-esser for small drops.
If the highs level is only slightly too high, this slider reduces the effect of the de-esser, leaving a brighter sound. If the highs get really loud, the de-essing behavior is not changed.
Bass/Highs hole punch protection panel
Bass/Highs hole punch protection settings panel
Deprecated settings panel
Highs hole punch protection panel
Protect against volume drops caused by loud highs.
Protects the sound against volume drops caused by extremely loud (often pre-emphasized) highs. The only reason why this is configurable is that it takes a lot of CPU power.
- Method
Needed for backward compatibility with older presets.
Do not set this to Legacy mode.
- Leif's highs gap protection stages (CPU)
Protects against drops in the lows/mids caused by very loud highs.
Very loud highs (which can easily occur due to pre-emphasis) can push all other sounds down in level. This gives a very annoying, restless effect.
Leif's high gap protection is the replacement of the older Highs gap protection, which used far more CPU load to achieve the same effect.
- Also reduce loud bass if affects other sounds
Protects mid/highs against drops caused by loud bass sounds.
Very loud bass sounds tend to push everything else down, leading to a somewhat dull and less loud sound. This filter protects against that.
- If it affects other sounds, also reduce loud bass below
Mid/highs are protected against bass upto this frequency.
- Dynamically drop lowest bass to make room for highs
If both loud bass and loud highs are present, drop the bass a bit to make room for the highs.
- Maximum bass stages
- Highs/Rest Threshold
How much drop of levels is allowed before the gap protection needs to work.
A lower value will reduce the quality of the highs somewhat, but protect the mids much better.
A higher value gives pristine and loud highs, but at the cost of a less tight sound and less consistency in the mids.
- Highest vs lowest highs priority
- Legacy highest vs lowest highs priority behavior
- Protect against highs above
- Pre-clip
- Pre-clip
- Highs gap protection: Always
Always turns Highs hole punch protection on.
- Highs gap protection: Always HQ
Always run Highs hole punch protection in high quality mode.
High quality mode uses twice as much CPU power as normal quality mode, but it's more effective at removing volume drops.
- Highs gap protection: Preemphasized
Turns on Highs hole punch protection when Pre-emphasis or Prepare for lossy compression (MP3/AAC/OGG/...) is used.
- Highs gap protection: Preemphasized HQ
Run Highs hole punch protection in high quality mode for pre-emphasized audio.
High quality mode uses twice as much CPU power as normal quality mode. For pre-emphasized audio it's wise to turn it on, because the high frequencies can be extremely loud.
CPU section
Settings that control the CPU usage (vs. quality) of the Advanced Clipper.
CPU panel
- Strictness (CPU)
Controls how strictly the clipper clips.
Lower values leave more small spikes in the output signal, which (if you don't want spikes) need to be removed by HARD LIMIT. And HARD LIMIT removes the spikes by lowering the output level. Strictness is configurable because higher Strictness levels cost much more CPU processing power.
CPU usage settings panel
- Take some shortcuts (CPU, reduces quality)
Some calculations are done less precisely. May slightly reduce audio quality.
- Take oversampling shortcuts
Some processing steps are done at a lower than optimal sample rate.
- Stronger clipping
Forces the clipper to more aggressively remove spikes.
This allows a lower Strictness (CPU) setting to reach the same level of remaining (small) spikes which can be cleaned up with Hard Limit output. The audio quality may get slightly reduced though.
Bass intermodulation distortion protection section
Settings that protect the Advanced Clipper against intermodulation distortion.
Intermodulation distortion is the type of distorting that is caused by loud bass sounds, which create 'holes' in other frequency ranges. (Intermodulation distortion is actually any kind of distortion created by modulation effects between different frequencies, but the type caused by low bass frequencies is harder to clean up).
Bass intermodulation distortion protection panel
Distortion protection panel
Protect panel
Intermodulation distortion protection settings.
- Intermodulation distortion protection
Enables bass intermodulation distortion protection.
Bass intermodulation distortion protection settings panel
Global panel
- Sloppy (louder, more open, more distortion)
Allow more distortion, to give a slightly more open but also more distorted sound.
- Reduce voice vibrations
Detect and attempt to remove intermodulation distortion in voices, caused by loud bass.
More punchy bass delayed clipping settings panel
Bass punch settings.
More punch settings panel
- Punch duration
Create a very punchy bass sound.
Delay bass clipping at the start of a new bass sound for this amount of time. The onset of the bass is not reduced, leading to a very punchy bass sound. But also potentially to some distortion - although this type of very brief distortion is almost not noticeable.
- Punch delayed clipped threshold
The clipping level used during the delay.
This level should be at or above Clip threshold.
- Relative sensitivity
Reduces the bass sensitivity effect during delayed clipping.
Despite what was said in Punch duration, in some cases delayed clipping can cause noticeable distortion. Because of that, the clipping level will still be reduced a bit if Reduce bass for mids or Reduce bass for highs indicate that it should be reduced. This slider controls how strongly it responds during the onset of a bass.
If Clip threshold is 90%, Protection threshold is 70%, Punch delayed clipped threshold is 100%, then the difference between the maximum (90%) and calculated (say 80%) level is used and multplied by this value. So say it's set to 0.5, then the delayed clipping level that is used will be 100% - 0.5 * (90% - 80%) = 95%.
- Response speed
Determines how quickly a new delayed clip can occur.
A punchy sound means that the volume goes up suddenly. To determine whether the volume goes up, we need to keep track of the average level - this value tells the detection algorithm what the lowest frequency is that it can expect in the input, which helps to determine how fast it should respond to lower sample values.
Pre and post bass filter panel
Pre bass filter panel
Pre-bass clipper.
This filter is intended to be used to reduce very loud very low frequency content. This slightly improves the rest of the audio - and very low bass sounds are typically not or hardly audible.
- Pre-bass clipper
Enables the pre-bass clipper.
- Bass clipping from 0 Hz up to
Bass clipping works fully on bass frequencies below this one.
- Bass drop to no clipping at
Bass clipping completely ignores frequencies above this one.
- Bass clip threshold
Pre-bass clipping threshold.
- Bass clipping strictness
Pre-bass clipping strictness.
Setting this higher clips the bass more strictly, at the cost of increased CPU load.
Bass panel
Dynamic bass clipper settings.
More bass clipper settings panel
Behavior panel
- Reduce asymmetric bass
Clips bass harder if it's asymmetrical.
Asymmetrical bass (just like asymmetrical mids, which are handled by Phase rotation) are as bad for the sound as symmetrical bass sounds at half the frequency - meaning that they can easily cause very noticeable intermodulation distortion. If this setting is checked, the detection of asymmetrical bass causes the bass clipping level to be lowered, which protects the other sounds.
- Smooth slope
Improved bass filter slope.
This should always be turned on, it's here for compatibility with older presets.
- Mids clipping strictness
- Very low bass - Clipping from 0 Hz up to
Bass clipping works fully on bass frequencies below this one.
- Very low bass - Drop to no clipping at
Bass clipping completely ignores frequencies above this one.
- Clip threshold
Whatever the input is, the bass may never exceed this level.
So even if there's only bass present, if this level is set low, it will not reach full modulation.
- Protection threshold
Reduce bass further if it causes problems.
If Reduce bass for mids or Reduce bass for highs indicates that the bass is damaging other sounds, by potentially causing intermodulation distortion, the bass clipping level is reduced further, at most this level.
If this level is much lower than Clip threshold, the effect on the bass level may become noticeable and annoying.
- Mid-bass protection
Setting for compatibility with older presets.
Do not turn this on.
Post bass filter panel
Post-bass clipper.
This filter is intended to filter a wider low frequency range at a high level. This slightly improves the rest of the audio.
- Secondary bass clipper
Enables the post-bass clipper.
Mid-bass protection panel
Mids protection panel
Dynamic protection against mids intermodulation distortion caused by bass.
- Mids clipping
Mids clipping level.
- Reduce bass for mids
Reduces the bass clipping level if loud mid frequencies are present.
Bass combined with loud mid frequencies can easily cause intermodulation distortion. Setting this sensitivity higher causes the bass clipping level to be dropped further. This also means that the bass level goes down.
- Constant tone distortion protection: Smoothe mid frequencies
The number of bins around a spike that are protected against distortion.
Constant tones such as voices are especially susceptable to intermodulation distortion from bass sounds. Or actually, there is not more intermodulation but it is far more noticeable.
This slider controls, when a frequency that sticks out is detected, how big the area around it is that needs to be protected against bass intermodulation distortion.
Setting this higher gives more protection, but also slightly lowers the output level.
- Constant tone distortion protection: Peak detection steepness
Controls the detection of single frequency peaks for Link error '3398'.
See Constant tone distortion protection: Smoothe mid frequencies. Increasing this value allows more peaks to be detected and protected. But if too many peaks are protected, there will be a slight volume loss.
Highs protection panel
Dynamic protection against highs intermodulation distortion caused by bass.
- Highs clipping
The highs clipping level.
- Reduce bass for highs
Reduces the bass clipping level if loud high frequencies are present.
Bass combined with loud high frequencies can easily cause intermodulation distortion. Setting this sensitivity higher causes the bass clipping level to be dropped further. This also means that the bass level goes down.
- Allowed highs distortion
Determines how strongly the high frequencies are protected against bass.
Without protection, a combination of loud bass and loud highs leads to quite horrible intermodulation distortion from the bass in the highs, as can be heard on my FM radio stations. Stereo Tool contains a unique filter that detects when this is noticeable, and fixes it.
This slider controls how strongly the protection works. Opposed to what you may expect, protecting it too much can by itself cause something that sounds like intermodulation distortion, and the protection slightly lowers the level of the highs frequencies.
A value of a few percent seems to work best. This also depends a bit on the Allowed highs distortion clipping strictness slider.
- Allow distortion on thunder bass (threshold)
- Allowed highs distortion clipping strictness
How strictly highs intermodulation distortion is repaired.
Affects both the quality and the CPU load.
- Highs priority
Selects between clean highs and constant volume levels.
High frequencies can get extremely loud due to FM Pre-emphasis. With this slider, you can choose if you want to keep the volume of all other sounds constant (low values), or if you want loud highs to be able to push other frequencies down. That allows the highs to sound brighter, but pumping caused by loud highs is very annoying in music.
If you are using Composite Clipping, higher values are less problematic, because highs are less problematic.
- Legacy highs/bass IMD protection
- Reduce bass to avoid highs distortion strength
- Reduce bass to avoid highs distortion threshold
- Reduce bass to avoid highs distortion for bass up to
Sound section
Settings that control the sound.
Sound panel
Miscellaneous panel
Open sound panel
By allowing a bit of extra distortion in some situations, the highs sound far more open.
The tight noise filtering can cause the highs to sound somewhat 'squeezed', while in many cases allowing a bit of extra noise in the high frequencies can make the highs sound both louder and less 'restrained'/squeezed.
Open sound settings panel
- Airy Highs short
Allows extra highs distortion for loud short-term noise sounds.
- Airy Highs long
Allows extra distortion for longer-term (~100 ms) loud high noise sounds.
- Airy Highs tone sensitivity
Reduces Airy Highs short and Airy Highs long if the highs contain tones.
- Time spread Short
Slightly changes the sound when Airy Highs short is used.
- Time spread Medium
Slightly changes the sound when Airy Highs long is used.
Priorities panel
Prioritize loud sounds panel
Gives priority to frequencies that sound louder.
This follows the human hearing and FM pre-emhpasis curves, and prioritizes those sounds that will pass through the combination of human hearing and pre-emphasis with the least effort.
- Prioritize loud sounds
Enables prioritizing of louder sounds.
Grain panel
- Softer and duller but less grainy
Artistic effects panel
Add some distortion, always or to give more headroom to loud sounds.
Originally, this section was intended to add distortion as an 'artistic effect', but for that purpose
Controlled distortion was added later which gives a much more precise control.
It can however also be used to allow a bit more distortion when it's most likely not noticeable, and the sound is really loud. This makes the sound less 'squashed'.
- Dirty Bass
Allows more distortion in bass frequencies, caused by bass frequencies.
- Dirty Mids
Allows more distortion in the mid frequencies.
- Dirty Highs
Allows more distortion in the high frequencies.
- Protect tones
Reduces dirty mids and highs when tones are present.
- Only for loud highs
Turns all the Dirty settings off if there are no loud highs present.
Asymptotic panel
- Asymptotic -3 dB threshold
Sparkling highs panel
Settings that control the highs part of the clipper audio texture.
- Sparkling highs
Enables Sparkling Highs.
Sparkling Highs sound - well - sparking, less clean.
Sparking highs settings panel
- Strength
Determines the amount of sparkle in the highs.
- Soft focus
Makes frequencies spread out a bit.
When looking at a spectrum display, tones get a "glow" around them, it looks a bit like a "soft focus" film or photo. Hence the name.
The effect on the sound is that it sounds fuller, but also less clean, somewhat distorted.
- Highs brilliance
Allows more distortion in the high frequencies.
Even harmonics panel
Even harmonics settings panel
- Maximum up to
- None above
- Maximum generation
- Limit effect
Controlled distortion panel
Adds a controlled amount of distortion, to replicate the sound of certain processors.
Most compressors don't have a clipper that delivers a signal that's as clean and free of distortion as Stereo Tool. Some people (not many...) seem to like this distortion. With Controlled Distortion you can replicate the distortion from those other processors, while still avoiding some really nasty types of distortion.
Detail settings panel
- Enable controlled distortion
Enables Controlled Distortion.
- Base level
Extra distortion allowed for all frequencies.
It is likely (but still needs to be checked) that with a very small amount of allowed distortion, the clipper might sounds more open. And the amount of extra distortion is so low that it's hardly noticeable.
Intermodulation distortion panel
- Sensitivity
Sensitivity for the introduction of intermodulation distortion.
With the added distortion, also certain really nasty types of distortion, such as intermodulation distortion in female voices combined with bass sounds can occur. This slider controls the detection of this type of distortion.
- Threshold
Controls the response to Limiter distortion.
'Sand paper' sound prevention panel
- Filter width
Sets the detection frequency range for detecting potentially audible crackles.
The Sand Filter detects larger (typically a few thousand Hz) areas in the spectrum with very little content that could mask crackling sounds caused by Controlled Distortion, and then protects those against the "sandy" (crackling) sound.
- Filter threshold
Sets the detection threshold for detecting potentially audible crackles.
A lower value means that less protection is performed. A higher value means that Controlled Distortion is very often disabled and doesn't do that much anymore.
Stokkemask FM section
ITU-R SM.1268 compliance settings.
The Stokkemask (ITU-R SM.1268) is a mask on the RF spectrum (see
RF spectrum analyzer). Enabling this mask makes the RF spectrum less wide, which improves multipath distortion and reception strength of your station, and reduces disturbances caused to weaker stations at nearby frequencies.
Using Stokkemask is mandatory in the Netherlands, but it improves reception everywhere. For stations that don't need to be compliant but do want the improved reception,
Multipath clipper can be used - it has less impact on the audio and the CPU load but it
should have the same advantages.
The Stokkemask filter can be used without using Composite Clipping, but the sound quality will suffer a lot, and the effects of the RDS and stereo pilot cannot be taken into account, which means that compliance cannot be completely guarranteed.
Stokkemask (same as under FM MPX) panel
Enables Stokkemask clipping mode.
Stokkemask CPU usage panel
Settings that affect the Stokkemask clipping CPU usage and audio quality.
- Stokkemask output level (if no MPX output)
Tells the non-composite Stokkemask clipper how loud the audio will be broadcast.
Basically, this is used to tell the Stokkemask clipper how much the audio level is reduced (below 100% modulation) because stereo and RDS are added.
- Skip smoothing (less strict)
Turns the smoothing off completely.
See Skip smoothing (less strict). The mentioned smoothing is turned off completely. The RF spectrum will show overshoots.
- Sloppy smoothing (lower audio quality)
Skip some steps in the Stokkemask filtering.
When spikes outside the Stokkemask are detected in the RF spectrum, the signal around those spikes needs to be clipped more strongly. Around means in both directions. If this checkbox is checked, this is only done in forward direction, because moving backwards through the data (at 16x oversampling) is very heavy, and doing this in one direction has almost the same effect as doing it in both directions.
You might want to keep this turned off if you really need to be 100% compliant.
RF spectrum analyzer panel
Shows the RF spectrum after FM modulation.
Note: This display assumes an absolutely perfect path to the transmitter, at exactly 75 kHz modulation.

